
JJR/C X9 HERON GPS 5G WiFi FPV R/C DRONE W/ GIMBAL
JJR/C X9 Heron GPS 5G WiFi FPV R/C Drone w/ Gimbal, $229.99 (www.jjrc.com...)
Manufactured by JJR/C (www.jjrc.com)
Last updated 05-19-20

This isn't a flashlight, household lamp, Christmas light set, or other thing that glows, but it *DOES* have a number of LEDs on its fuselage (this word is definitely *NOT* pronounced "fyoo SELL' uh jee" as Drake Parker from the TV program "Drake and Josh" would pronounce it; the word is pronounced " "
"  , so what the hey
I love things that fly; that's why I took the bate and also why I added a seperate section titled "PRODUCTS DESIGNED TO FLY" on my website a number of years ago and created a new website just a few months ago specifically for flying machines of this nature!!! I was also attracted to something that this drone has that many others don't...
- 1: It has GPS -- simply meaning that it can stably hover despite any mild wind and knows where 'Home' is.
- 2: It has brushless motors.
- 3: It has a gimbal to keep video rock stable.
- 4: It has a gyro -- that means it's easy to fly even for a "craptastic" pilot like me.
- 5: It has all of those wonderful LEDs
- 6: It has an
optical flow sensor; this allows the drone to stay stable in the air even when GPS isn't present -- such as when flying indoors.
7: It has folding propellers; this makes the Heron easier to store and transport.
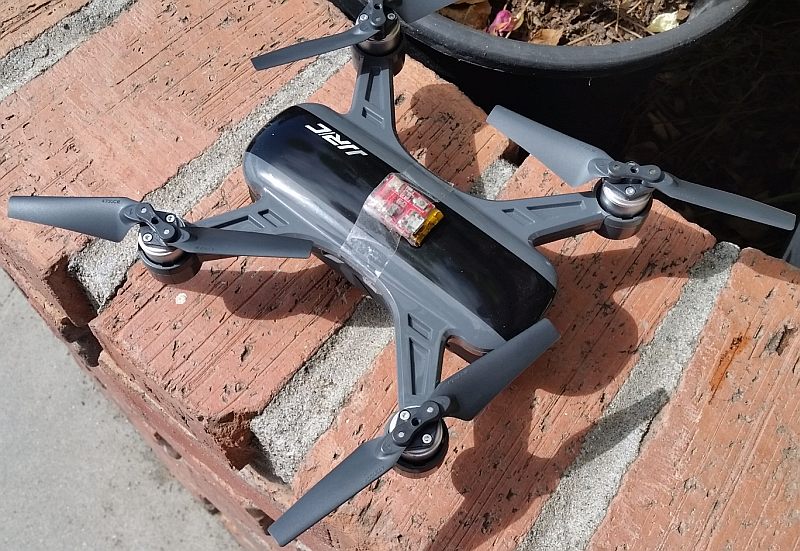
This is a small, lightweight (264g), easy-to-fly 4-channel, brushless motor remote-controlled outdoor (and indoors with sufficient space) drone that has a gimbal, and has advanced features like GPS tracking, follow-me mode, orbit mode, waypoints, etc. Its remote uses RF (radio frequency) radiation at 2.4GHz to communicate to and from the drone.
It sports BRUSHLESS motors that deliver incredible amounts of power and have a far longer useable lifetime than their brushed counterparts.
It also has an optical flow sensor to help it maintain its position when it is flown indoors or otherwise away from GPS lock.
And yes, the Heron flaunts a 1080p camera with a 5.8GHz transmitter to furnish a live video feed to the app; both still photos and aerial video can be taken with it!
The camera is stabilised by a two-axis gimbal; this simply means that your photographs will be clear and your videos rock-steady even if the drone is rocking and rolling.
You will however, need to procure your own MicroSD memory chip. I'd recommend a Class 10. If you use a memory chip that is rated lower than Class 10, you *MAY* see skipped frames, "jitters", unwanted intermittent video artifacts, and similar horse puckey.
In the photograph above, you should be able to easily spot an Anti-Collision Strobe for Drones -- however I removed it the very next day because it petered out. 
 SIZE
SIZE
As you can see, the Heron isn't a big drone; because of its relatively small size, it is being marketed as a travel drone.

This drone is a bit more complicated to get it to take off than your average toy-grade drone (with its GPS and brushless motors, this is a hobby-grade drone)...here's how to get it off the ground:
As with any rechargeable product, charge the drone's flight battery ***AND*** the transmitter first (see directly below), install the flight battery, and then you can pretend to fly a dragonfly -- well, that's what Coco might think it was if it were flown indoors!
Turn on the radio by pressing the circular button in the center of its top surface, and then press the back of the flight battery (yes, there's a button there), and quickly press it again -- but hold it this time for approx. two seconds or until the drone emits a series of high-pitched beeps.
Go to your Smartphones Wi-Fi Setting (your cellular telephone handset MUST support 5G -- aka. 802.11ac WiFi) and scan for available Wi-Fi Signals. With both the Heron Drone and Remote controller powered, the smartphone should display both the Heron Drone's and remote controller's Wi-Fi signals.
Take note of the remote controllers last 6 characters as this will be entered into the APP later for pairing/matching.
Now connect to the Heron Drone's Wifi Signal: Drone-940143
Once connected, proceed with opening the C-Fly APP.
Press start flying tab and the APP will open and show the camera view automatically on the APP. On the top right hand corner of the APP, click on the 3 dots to enter settings.
Click on the “PAIR” Tab to continue pairing the remote controller with the Heron Drone.
Enter the 6 characters of the remote controller as per earlier instructions and press the PAIR tab.
Once completed, close the APP and Power down the Drone and Remote controller.
Power the Drone ON again and then the remote controller.
Go to your Smartphones Wi-Fi Setting and scan for available Wi-Fi Signals. With both the Heron Drone and Remote controller powered, the smartphone should display both the Heron Drone and Remote controllers Wi-Fi signals.
Connect to the Heron Drone's Wi-Fi Signal.
Open the C-Fly APP and your Heron Drone and Remote controller are now paired together.
Latency is very low; that is, you'll have a true FPV experience with the Heron.
For additional instructions & tips on how to fly (including how to fly with your phone only or with the remote transmitter), please read the instructional material that comes with the product.
On the remote control, press and hold the "OFF/ON" button near the center of the transmitter and press and hold the "OFF/ON" button on the back of the drone's battery itself to neutralise them when you are finished.
I noticed that the app drains power from your phone battery rather quickly, so it might behoove you to completely close the app at this time as well.

The batteries in the JJR/C X9 Heron AND in the radio are rechargeable; this is how to take care of that.
To charge the battery in the JJR/C X9 Heron, plug the USB-end of the charge cable into any of your PC or Mac's USB receptacles, and plug the smaller end of the cable into the micro USB receptacle on the charger box.
Slide the battery onto the terminals on the charger box until it stops. When the charge cycle is in progress, a red LED on the charger box will be flashing red (the charging process takes approximately three hours). When the charge cycle is complete, this LED should illuminate bright green.
You may then safely unplug the battery from the charger, and unplug the charger from the USB port on your computer.
Fully charging the JJR/C X9 Heron' battery should give you approx 15 minutes of flying time; I've been getting flight times ranging from 11 to 15 minutes so this advertised value is indeed reasonably accurate.
The battery has an inbuilt "charge remaining" tester; just push the button on the battery and a series of green LEDs will light up, indicating the charge status.
Five lights indicates full power; four lights is 80%, three lights is 60%, and so on.
To charge the battery in the radio, plug the larger end of the USB charging cable into any free USB port on your Mac or Pee-Cee computer, and plug the smaller end into the receptacle for it on the front of the radio's body. Green LEDs on the radio should now come on and cascade left to right. When both lights on the radio are steady-on, the charge cycle is complete and you can now safely unplug the cable from the radio and from your computer.
If your computer does not have a USB port (or doesn't have a free one), you may plug the USB-end of either cable into something like a cellular telephone charger.

This R/C drone is meant to be used as a toy in a dry area outdoors (or in a reasonably large open room indoors), not as a flashlight meant to be carried around all the time, thrashed, and abused; so I won't throw it against the wall, stomp on it, try to drown it in the {vulgar slang term for a fudge bunny}bowl or the cistern, run over it, swing it against the concrete floor of a patio, bash it open to check it for candiosity, fire it from the cannońata (I guess I've been watching the TV program "Viva Pińata" too much again - candiosity is usually checked with a scanner-type device on a platform with a large readout, with a handheld wand that Langston Lickatoad uses, or with a pack-of-cards-sized device that Fergy Fudgehog uses; and the cannońata is only used to shoot pińatas to pińata parties away from picturesque Pińata Island), send it to the Daystrom Institute for additional analyses, or inflict upon it punishments that I might inflict upon a flashlight.
So this section of the drone's web page will be significantly more bare than this section of the web page on a page about a flashlight.
The unit has a 4-channel remote control; this allows for forward / backward / up / down / left / right movement (movement on all three axes -- X, Y, and Z). It also has a fully proportional control system; simply meaning that the motor speeds can be varied depending on how far you move the joysticks -- it isn't simply "full power and no power at all" like some other R/C products.
The camera has a video resolution of 1920×1080 (1080p video quality).
The optical flow stabilisation functions at an altitude range of 0.50M (~1.64 feet) to 5.0M (~16.40 feet); it also requires a definite "pattern" on the ground; e.g. the optical flow system will function rather poorly if the ground has very little or no features on it. Finally, you need to have a decently bright operating environment -- it won't function outdoors at night for example. Speaking of light, the area must have no less than 15 lux of illumination.
Does this evaluation look an awful lot like the one that I made for this drone?
Thought that you'd say so.
That's because they're physically and electrically extremely similar, so I could use its evaluation as a template for this one.
In fact, this is a clone of the C-Fly DREAM.
The camera performs unexpectedly poorly in low light conditions (such as at dusk or dawn); though you do get bright clear pictures and video when you fly the Heron in daylight -- full sun to be specific.
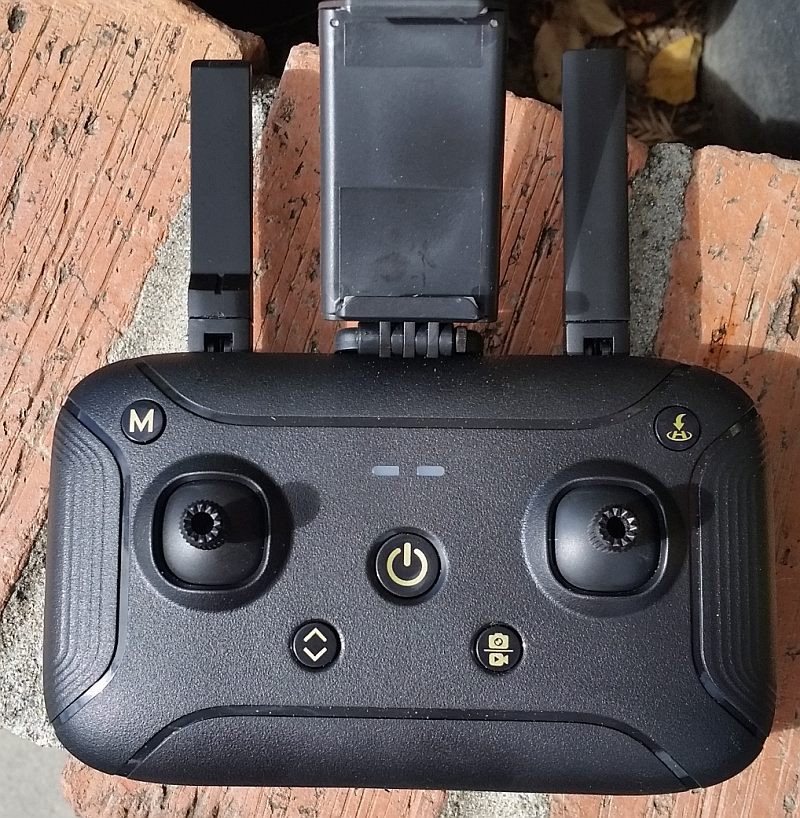
Photograph of its remote control with the cellular telephone handset clip attached.
HERON'S POWER UP SOUND
(in .WAV format; 201,455 bytes)

ALL OF THE FLIGHT VIDEOS ARE ON THEIR OWN WEB PAGE
SO THAT THIS EVAL. WOULD NOT BECOME TOO CUMBERSOME!!!
TEST NOTES:
Test unit was purchased on Ebay on 05-03-20 and was received at 3:17pm PDT on 05-11-20.
Since I purchased a spare battery for my C-Fly Dream shortly before it failed, I now have THREE flight batteries for the Heron (the one it came with, the one that my C-Fly Dream came with, and the spare that I purchased for the Dream)! 
UPDATE: 05-15-20
I've been using the C-Fly app (the one used with the C-Fly DREAM GPS 5G WiFi FPV R/C Drone) and I have no issues to report.
However, if you cannot locate the C-Fly app, you may scan the QR codes shown directly below to obtain the Heron's app for Android and IOS.

UPDATE: 05-18-20
On a flight (attempt) that I made on the morning of 05-17-20, the starboard (right) rear motor failed to spin up, so the drone just spins around on the surface and never does become airborne. :-(
The drone has never crashed and has never been exposed to water or other liquids.
Therefore, that always-dreadful, " " icon must be appended to its listings on this website.
UPDATE: 05-19-20
I love the living tweedle out of the little fella, and I do fully intend on getting it repaired; I hope to be able to send the drone to its repairer by early-June 2020 and have it back by mid-month.
PROS:
Nice looking drone
Latency is surprisingly low
Decent flight battery life (well over 10 mins.; sometimes 15+ mins.)
Relatively nimble and responsive to inputs on its transmitter
Decent camera quality -- not the best but FAR from the worst!
Folding props to help facilitate storage and transport
NEUTRAL:
CONS:
The camera performs unexpectedly poorly in low light conditions
MANUFACTURER: JJR/C
PRODUCT TYPE: R/C GPS quadcopter (drone) w/folding props and inbuilt camera on a 2-axis gimbal
LAMP TYPE: LED
No. OF LAMPS: 12 (2 bicolor red/green in remote, 1 bicolor red/green in charger, 2 red, 2 bicolor green/blue in drone, 5 green in battery)
BEAM TYPE: N/A
SWITCH TYPE: Pushbutton on/off on remote, pushbutton on/off on drone (battery)
CASE MATERIAL: Plastic
BEZEL: N/A
BATTERY: 3.70V 2,600mAh (2.6Ah) Li:PO battery for remote; 11.40V 1,000mAh (1.0Ah) Li:PO battery for drone
CURRENT CONSUMPTION: Unknown/unable to measure
WATER- AND URANATION-RESISTANT: Very light sprinkle-resistance only
SUBMERSIBLE: EIN GROßER RIESIGER GEIST, DER EINEN RIESIGEN PLUMPS NIMMT UND DANN DEN KOPF UNROT NEIN VERLÄSST!!! 
ACCESSORIES: 2x spare prop assemblies (each has two blades on a hub), flight battery, USB charger, mobile phone holder, Allen wrenches, user manual
SIZE: 148mm L X 145mm W X 60 mm T
WEIGHT: {Drone}: 264g (9.310 oz.) (incl. battery); {Radio}: 201g (7.090 oz.) (incl. battery); mobile phone holder: 20g (0.710 oz.; battery: 82g (2.89 oz.))
COUNTRY OF MANUFACTURE: China
WARRANTY: One year
PRODUCT RATING:
JJR/C X9 Heron * www.jjrc.com...
Do you manufacture or sell an LED flashlight, task light, utility light, or module of some kind?
Want to see it tested by a real person, under real working conditions? Do you then want to see how your light did? If you have a sample available for this type of
real-world, real-time testing, please contact me at happydd1964@gmail.com.
Please visit this web page for contact information.
Unsolicited flashlights, LEDs, and other products appearing in the mail are welcome, and it will automatically be assumed that you sent it in order to have it tested and evaluated for this site.
Be sure to include contact info or your company website's URL so visitors here will know where to purchase your product.
This page is a frame from a website.
If you arrived on this page through an outside link,you can get the "full meal deal" by clicking here.