
EACHINE H8C R/C DRONE
Eachine H8C R/C Drone $35.99 (www.eachine.com...)
Manufactured by Eachine (www.eachine.com/)
Last updated 01-21-18

This isn't a flashlight, household lamp, Christmas light set, or other thing that glows, but it *DOES* have a number of LEDs on its fuselage (this word is definitely *NOT* pronounced "fyoo SELL' uh jee" as Drake Parker from the TV program "Drake and Josh" would pronounce it; the word is pronounced " "
"  , so what the hey.
I love things that fly; that's why I took the bate and also why I added a seperate section titled "PRODUCTS DESIGNED TO FLY" on my website a number of years ago. I was also attracted to something that this drone has that many others don't...
- 1:It has a gyro -- that means it's easy to fly even for a "craptastic" pilot like me.
- 2: It has all of those wonderful LEDs
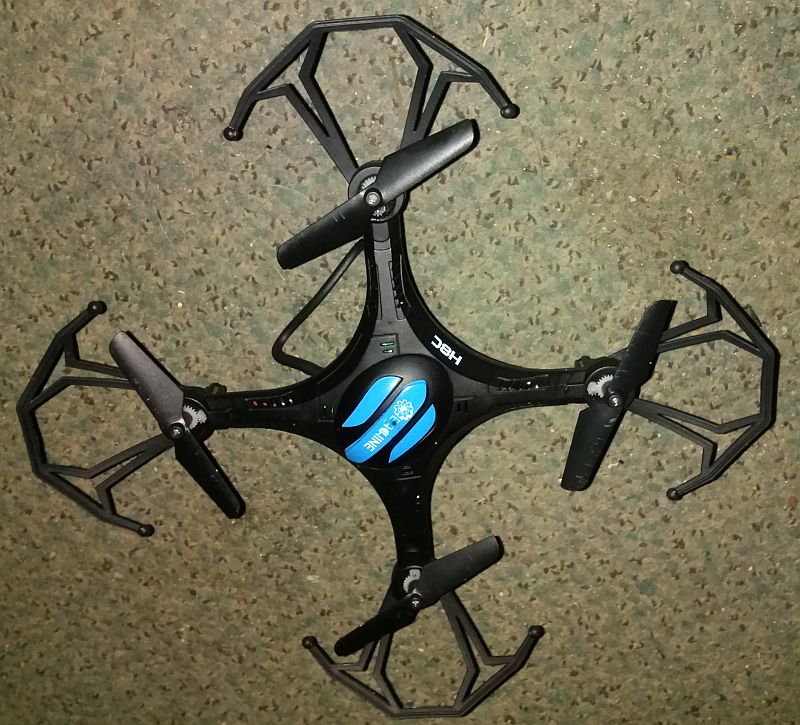
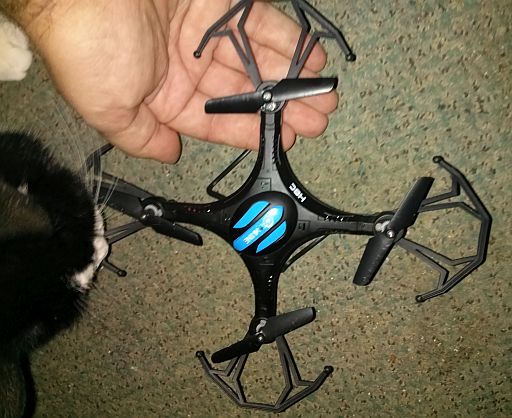
This is a small, lightweight (~20g), easy-to-fly 4-channel remote-controlled outdoor (and indoors with a large enough space) drone. Its remote uses RF (radio frequency) radiation.
It sports a camera; both still photos and aerial video can be taken with it!
 SIZE
SIZE

This toy is remarkably easy to use for a drone...here's how to get it off the ground:
As with any rechargeable product, charge it first (see directly below), then you can pretend to fly a dragonfly (well, that's what the kitty cats would think it was if it were designed to be flown in a small living room).
1: On the remote control, press & release the on/off switch button -- the switch is located directly between the two joysticks.
2: Slide the little black switch on the underside of the drone's fuselage (near the starboard {right} landing skid) toward the front of the drone and place the drone on the ground so that the tail-end (the end with the blue LEDs) faces you.
Move several feet away from the drone (at least six feet away).
3: The red light on the radio will now come on and start blinking. Push the left-hand stick on the remote control forward and then let it go back. This "arms" the drone. If you did this correctly, that red light will go from blinking to steady-on and the R/C should emit a series of two tones in rapid succession.
4: Gently push the left-hand stick on the remote control forward a second time -- but do so more gingerly this time so that the drone doesn't just blast away -- it has a good deal of thrust (not a WHOLE lot, but enough to catch new droners off-guard), so the possibility of it getting away in this manner does exist.
5: The Eachine H8C R/C Drone should now lift off the ground. Congratulations, you're now a pilot!!!
For additional instructions & tips on how to fly, please read the instructional material that comes with the product.
Turn off the Power switches on the drone & the radio when finished using them.
Same switches as before -- but slide the one on the drone in the opposite directions this time and simply press & release the Power button on the radio again as you did for turning it on.

The battery in the Eachine H8C R/C Drone itself is rechargeable; however the batteries in the remote will need to be changed from time to time.
To do this, unscrew & remove the phillips screw from the battery door on the underside of the unit, using the included small phillips screwdriver. Set the screw aside.
Slide the battery door off toward the rear of the radio, carry it to the top of the basement stairs, and kick it down those stairs into the basement crawling with thousands of hungry silverfish that have to piddle -- they'll think it's something yummy to eat and start chewing on it, but quickly find it unpalatable, so they all go pee-pee on it...O WAIT!!! YOU'LL NEED THAT!!! So just set it aside instead.
Remove the four used AA cells from the compartment, and dispose of or recycle them as you see fit.
Insert four new AA cells into the compartment, orienting each cell so its flat-end (-) negative faces the spring for it in each chamber.
Finally, place the battery door back on, and screw the screw back in.
The screw is simply to make the radio childproof in that the AA cells cannot be removed and then swallowed by a child -- if you live in a household without young children, the screw can actually be left off and stashed in a drawer somewhere; such as in the kitchen garbage drawer. (Cummon admit it! I bet you have a drawer like this somewhere in your home...very probably in the kitchen as well!)
Aren't you glad you didn't kick that battery door down the stairs to all those hungry, hungry silverfish that really need to pass micturition now?
To charge the battery in the Eachine H8C R/C Drone, plug the large end into a USB port on your computer. Take the thin cord that's attached to the USB charger dongle, and plug the small end into the female receptacle located on the underside of the drone's fuselage.
When the charge cycle is in progress, the red LED on the charger will be off. When the charge cycle is complete, this LED should turn on.
You may then safely unplug the drone from the charger, and unplug the USB dongle from your computer.
Fully charging the Eachine H8C R/C Drone' battery should give you approx 5 to 8 minutes of flying time.
Although the battery is encased in the drone itself, it can rather easily be accessed by removing the drone's upper canopy which simply pops off. The battery is held in place by double-sided tape; if you want (or have) to replace it, you may fasten the replacement in with more double-sided tape or just use two little pieces of Velcro or equivalent hook-and-loop fastener. Electrically, the battery has a plug -- it isn't soldered into place like it is in the Syma S107G R/C Coaxial Helicopter for example.

This RC drone is meant to be used as a toy in a dry area outdoors (or in a large open room indoors), not as a flashlight meant to be carried around all the time, thrashed, trashed, and abused; so I won't throw it against the wall, stomp on it, try to drown it in the {vulgar slang term for a fudge bunny}bowl or the cistern, run over it, swing it against the concrete floor of a patio, bash it open to check it for candiosity, fire it from the cannońata (I guess I've been watching the TV program "Viva Pińata" too much again - candiosity is usually checked with a scanner-type device on a platform with a large readout, with a handheld wand that Langston Lickatoad uses, or with a pack-of-cards-sized device that Fergy Fudgehog uses; and the cannońata is only used to shoot pińatas to pińata parties away from picturesque Pińata Island), send it to the Daystrom Institute for additional analyses, or inflict upon it punishments that I might inflict upon a flashlight.
So this section of the drone's web page will be significantly more bare than this section of the web page on a page about a flashlight.
The range of the radio in the Tx (R/C hobby talk for "transmitter") is stated as 100 meters (~328 feet) {however, my tested useful range is unexpectly short; less than ~15.24 meters (50 feet) -- plus the drone has a random lag time of up to several seconds when responding to controller input...these are what prevented it from rating really high on this website.  }; frequency is stated as 2.4GHz.
The unit has a 4-channel remote control; this allows for forward / backward / up / down / left / right movement (movement on all three axes -- X, Y, and Z). It also has a fully proportional control system; simply meaning that the motor speeds can be varied depending on how far you move the joysticks -- it isn't simply "full power and no power at all" like some other R/C products.
One thing that it lacks is an altitude hold feature. When the drone is gaining altitude, it will keep going up, up and away unless you pay close attention to it so that you can throttle back on that left stick!!!
This is actually a good thing here; it helps to teach the concept of throttle management to new droners; after all, better to accidentally lose a $35 drone due to poor throttle management than to lose a $1,000 drone for the same reason!!! Throttle punch isn't tremendous, but like I said, it can catch new droners with their pants down so to speak.
The camera has a pixel density of 2.0MP -- that's 2,000,000 pixels; I found this to be fairly impressive given the size and low cost of the drone. 
The flight camera is fixed at an unusually steep downward angle (looks to be approx. 45° from horizontal); you'll be getting a lot of video & still pics of "ground" when flying this drone.
The Micro-SD memory card that the drone records photos & video on is NOT included; you'll need to procure that on your own or have a stash of them ready to roll. The card fits into a slot for it on the underside of the drone's fuselage under the port (left) landing skid.
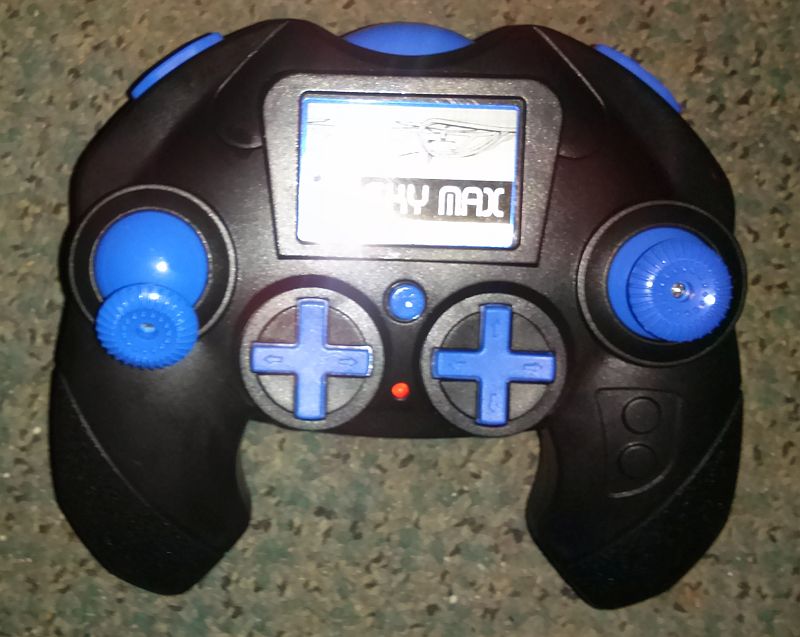
Photograph of its remote control.

ALL OF THE FLIGHT VIDEOS ARE ON THEIR OWN WEB PAGE
SO THAT THIS EVAL. WOULD NOT BECOME TOO CUMBERSOME!!!
TEST NOTES:
Test unit was purchased on Ebay on 12-04-17 (or "2017 04 Dec." or even "December 04, Twenty Stick-Broken-Stick" if you prefer), and was received on the afternoon of 12-07-17.
UPDATE: 01-21-18
The drone flew beyond the range of its radio and went down in a heavily wooded area not accessible in my motorised wheelchair. Therefore, the dreadful, " " icon must be used to denote that it has become lost in the line of duty.
MANUFACTURER: Eachine
PRODUCT TYPE: Mini-sized R/C quadcopter (drone) w/inbuilt camera
LAMP TYPE: LED
No. OF LAMPS: 8 (1 red in radio, 1 red in charger, 2 red & 2 blue in drone itself, 1 red & 1 green in drone's camera module
BEAM TYPE: N/A
SWITCH TYPE: Slide on/off on drone & pushbutton on/off on radio
CASE MATERIAL: Plastic
BEZEL: N/A
BATTERY: 4x AA cells for radio; 3.70V 300mAh Li:PO battery for drone
CURRENT CONSUMPTION: Unknown/unable to measure
WATER- AND MOOSE PEE-RESISTANT: Very light sprinkle-resistance only
SUBMERSIBLE: EIN GROßER RIESIGER GEIST, DER EINEN RIESIGEN PLUMPS NIMMT UND DANN DEN KOPF UNROT NEIN VERLÄSST!!! 
ACCESSORIES: USB charging dongle w/ cable, 2x front rotor blades, 2x rear rotor blades, 4x blade guards, 2x landing skids, small Phillips screwdriver
SIZE: 180mm Sq. x 55mm T
WEIGHT: ~20g incl. battery
COUNTRY OF MANUFACTURE: China
WARRANTY: Unknown/not stated
PRODUCT RATING:

Eachine H8C R/C Drone * www.eachine.com...
Do you manufacture or sell an LED flashlight, task light, utility light, or module of some kind?
Want to see it tested by a real person, under real working conditions? Do you then want to see how your light did? If you have a sample available for this type of
real-world, real-time testing, please contact me at bdf1111@yahoo.com.
Please visit this web page for contact information.
Unsolicited flashlights, LEDs, and other products appearing in the mail are welcome, and it will automatically be assumed that you sent it in order to have it tested and evaluated for this site.
Be sure to include contact info or your company website's URL so visitors here will know where to purchase your product.
This page is a frame from a website.
If you arrived on this page through an outside link,you can get the "full meal deal" by clicking here.